Open Port 80 (HTTP Web Server Port) in CentOS / Redhat

The default configuration file for iptables based firewall under RHEL / CentOS / Fedora Linux is /etc/sysconfig/iptables.


# vi /etc/sysconfig/iptables

Add extra lines in red


# Firewall configuration written by system-config-firewall
# Manual customization of this file is not recommended.
*filter
:INPUT ACCEPT [0:0]
:FORWARD ACCEPT [0:0]
:OUTPUT ACCEPT [0:0]
-A INPUT -m state –state ESTABLISHED,RELATED -j ACCEPT
-A INPUT -p icmp -j ACCEPT
-A INPUT -i lo -j ACCEPT
-A INPUT -m state –state NEW -m tcp -p tcp –dport 22 -j ACCEPT
-A INPUT -m state –state NEW -m tcp -p tcp –dport 80 -j ACCEPT
-A INPUT -m state –state NEW -m tcp -p tcp –dport 443 -j ACCEPT
-A INPUT -j REJECT –reject-with icmp-host-prohibited
-A FORWARD -j REJECT –reject-with icmp-host-prohibited

COMMIT


# /etc/init.d/iptables restart


policy / source based Routing – Linux

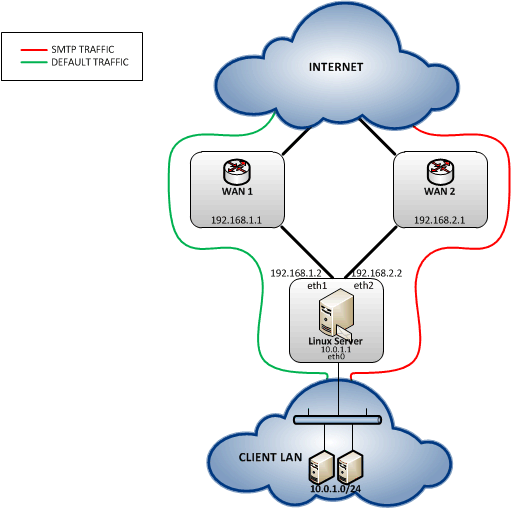
In the following example, we have 2 gateways to the internet and we have 1 default route. In this scenario, the default route(the link that all traffic will go out to), is WAN1. We want only SMTP/email traffic to go out via WAN2, but all other traffic to follow te default route via WAN1. The following assumes that you have already setup NAT, the routes and everything is running as per a normal Africa Online gateway solution.

PolicyRouting.gif
FIRST – Since the outgoing email/SMTP packets are locally generated packets, we will have to use the OUTPUT chain.
SECOND – Since there are two possible routes, you have to use MASQUERADE in order to force the source address of the packet to be the same as the source address of the intended network interface where the packet is going out from.

# /sbin/iptables -t mangle -A OUTPUT -p tcp --dport 25 -j MARK --set-mark 1
# /sbin/iptables -t nat -A POSTROUTING -o eth2 -p tcp --dport 25 -j MASQUERADE

Next, we’ll use “ip route” to route packets based upon protocol instead of source and destination. This is because of a limitation with the normal “route” command in linux- it only routes packets based on source and/or destination and we need something that does policy routing. From the ip(8) manpage: http://linux.die.net/man/8/ip

Route tables: Linux-2.x can pack routes into several routing tables identified by a number in the range from 1 to 255 or by name from the file /etc/iproute2/rt_tables. By default all normal routes are inserted into the main table (ID 254) and the kernel only uses this table when calculating routes.

So, we add a new table definition specifically for SMTP traffic to /etc/iproute2/rt_tables:

# echo 201 mail.out >> /etc/iproute2/rt_tables
# ip rule add fwmark 1 table mail.out
# ip rule ls
0:	from all lookup local
32764:	from all fwmark        1 lookup mail.out
32766:	from all lookup main
32767:	from all lookup default

Now we generate a route to the slow but cheap link in the mail.out table:
# /sbin/ip route add default via 192.168.2.1 dev eth2 table mail.out
Now all SMTP traffic generated locally by the box will route out the gateway 192.168.2.1. The normal “ip route” command won’t show the real state of things. Instead, we need to specify which table to look in for the route. Remember that we added the table to /etc/iproute2/rt_tables before, so do:

# ip route show table mail.out
default via 192.168.2.1 dev eth2

If you want to see what’s in the mangle table, do:

# iptables -t mangle -nvL


NTFS read write – Mac OS X mountain lion

To Read/Write/Format NTFS from Mac OS X, here are some alternatives:
For Mac OS X 10.4 or later (32 or 64-bit), install Paragon (approx $20) (Best Choice for Lion)
For 32-bit Mac OS X, install NTFS-3G for Mac OS X (free) (does not work in 64-bit mode)
For 64-bit Snow Leopard, read this: MacFUSE for 64-bit Snow Leopard
Some have reported problems using Tuxera (approx $36).
Native NTFS support can be enabled in Snow Leopard and Lion, but is not advisable, due to instability.

Squid – make HTTPS proxy

There seems to be a bit of confusion about configuring SQUID to transparently intercept SSL (read: HTTPS) connections. Some sites say it’s plain not possible:

http://www.faqs.org/docs/Linux-mini/TransparentProxy.html#ss2.3

Recent development in SQUID features have made this possible. This article explores how to set this up at a basic level. The SQUID proxy will basically act as a man in the middle. The motivation behind setting this up is to decrypt HTTPS connections to apply content filtering and so on.

There are some concerns that transparently intercepting HTTPS traffic is unethical and can cause legality issues. True, and I agree that monitoring HTTPS connections without properly and explicitly notifying the user is bad but we can use technical means to ensure that the user is properly notified and even gets prompted to accept monitoring or back out. More on this towards the end of the article

So, on to the technical details of setting the proxy up. First, install the dependencies . We will need to compile SQUID from scratch since by default it’s not compiled using the necessary switches. I recommend downloading the latest 3.1 version, especially if you want to notify users about the monitoring. In ubuntu:

apt-get install build-essential libssl-dev

Note : for CentOS users, use openssl-devel rather than libssl-dev

Build-essentials downloads the compilers while libssl downloads SSL libraries that enable SQUID to intercept the encrypted traffic. This package (libssl) is needed during compilation. Without it, when running make you will see the errors similar to the following in the console:

error: ‘SSL’ was not declared in this scope

Download and extract the SQUID source code from their site. Next, configure, compile and install the source code using:

./configure –enable-icap-client –enable-ssl
make
make install

Note the switches I included in the configure command:

* enable-icap-client : we’ll need this to use ICAP to provide a notification page to clients that they are being monitored.

* enable-ssl : this is a prerequisite for SslBump, which squid uses to intercept SSL traffic transparently

Once SQUID has been installed, a very important step is to create the certificate that SQUID will present to the end client. In a test environment, you can easily create a self-signed certificate using OpenSSL by using the following:

openssl req -new -newkey rsa:1024 -days 365 -nodes -x509 -keyout http://www.sample.com.pem  -outhttp://www.sample.com.pem

This will of course cause the client browser to display an error:

In an enterprise environment you’ll probably want to generate the certificate using a CA that the clients already trust. For example, you could generate the certificate using microsoft’s CA and use certificate auto-enrolment to push the certificate out to all the clients in your domain.

Onto the actual SQUID configuration. Edit the /etc/squid.conf file to show the following:

always_direct allow all
ssl_bump allow all

http_port 192.9.200.32:3128 transparent

#the below should be placed on a single line
https_port 192.9.200.32:3129 transparent ssl-bump cert=/etc/squid/ssl_cert/www.sample.com.pem key=/etc/squid/ssl_cert/private/www.sample.com.pem

Note you may need to change the “cert=” and the “key=” to point to the correct file in your environment. Also of course you will need to change the IP address

The first directive (always_direct) is due to SslBump. By default ssl_bump is set to accelerator mode. In debug logs cache.log you’d see “failed to select source for”. In accelerator mode, the proxy does not know which backend server to use to retrieve the file from, so this directive instructs the proxy to ignore the accelerator mode. More details on this here:

http://www.squid-cache.org/Doc/config/always_direct/

The second directive (ssl_bump) instructs the proxy to allow all SSL connections, but this can be modified to restirct access. You can also use the “sslproxy_cert_error” to deny access to sites with invalid certificates. More details on this here:

http://wiki.squid-cache.org/Features/SslBump

Start squid and check for any errors. If no errors are reported, run:

netstat -nap | grep 3129

to make sure the proxy is up and running. Next, configure iptables to perform destination NAT, basically to redirect the traffic to the proxy:

iptables -t nat -A PREROUTING -i eth0 -p tcp –dport 80 -j DNAT –to-destination 192.9.200.32:3128
iptables -t nat -A PREROUTING -i eth0 -p tcp –dport 443 -j DNAT –to-destination 192.9.200.32:3129

Last thing to be done was to either place the proxy physically in line with the traffic or to redirect the traffic to the proxy using a router. Keep in mind that the proxy will change the source IP address of the requests to it’s own IP. In other words, by default it does not reflect the client IP.

That was it in my case. I did try to implement something similar to the above but using explicit mode. This was my squid.conf file, note only one port is needed for both HTTP and HTTPS since HTTPS is tunneled over HTTP using the CONNECT method:

always_direct allow all
ssl_bump allow all

#the below should be placed on a single line

http_port 8080 ssl-bump cert=/etc/squid/ssl_cert/proxy.testdomain.deCert.pem key=/etc/squid/ssl_cert/private/proxy.testdomain.deKey_without_Pp.pem

As regards my previous discussion of notifying users that they are being monitored, consider using greasyspoon:

http://dvas0004.wordpress.com/2011/02/28/squid-greasyspoon-enhancing-your-proxy-deployment-with-content-adaptation/

With this in place, you can instruct greasyspoon to send a notify page to the clients. If they accept this notify page, a cookie (let’s say the cookie is called “NotifySSL”) is set. GreasySpoon can then check for the presence of this cookie in subsequent requests and if present, allow the connection. If the cookie is not present, customers again get the notify page. Due to security considerations, most of the time cookies are only valid for one domain, so you may end up with users having to accept the notify for each different domain they visit. But, you can use greasyspoon in conjunction with a backend MySQL database or similar to record source IP addresses that have been notified and perform IP based notifications. Anything is possible :)

– courtesy:  http://blog.davidvassallo.me/2011/03/22/squid-transparent-ssl-interception/

Squid https transparent proxy setup with SSL

Squid https transparent proxy setup with SSL

Let’s understand first how squid proxy works in transparent mode. While setting up squid as a transparent proxy we can forward the entire request coming from port 80 to squid server’s port i.e. 3128 by default. When we talk about port 80 it means http protocol. What if we request for Gmail who uses https protocol and this protocol by default send request to port 443 of squid’s port, and we iptable firewall rules to forward traffic from port 80 to port 3128 and we forget about port 443 which is used by https protocol and squid is http proxy server. Now many folks may think it’s easy and forward all traffic coming from port 443 to squid port 3128.  No it won’t work.  Because https connection establishes a secure connection over the network and for that it uses certificate and public key private key pairs. And first of all I thanks God for RSA and DSA algorithm as it is not so easy to decrypt data which is encrypted by use of this algorithm. Squid proxy is a middle man who changes packets header and route traffic to internet world. So what we have to do is to create certificate and public key private key pair for internal network which can be used by squid client and squid server and later squid server can route your traffic to internet world. To yield faster results it is better to sign certificate from CA. self signed certificates are little bit slowing the connection. As in a transparent mode encryption and decryption done twice so it may yields result slow so I advised you to keep patience.

Steps are:

  1. iptables  -t nat -A PREROUTING -i eth0  -p tcp –dport 80 -j REDIRECT –to-port 3128
  2. iptables  -t nat -A PREROUTING  -i eth0 -p tcp –dport  443 -j REDIRECT –to-port 3130

Certificate and public key private key generation.

  1. openssl genrsa -des3 -out server. Key 1024
  2. openssl req -new –key -out server.csr
  3. openssl req -new -key server. Key -out server.csr

Steps to remove passphrase

  1. cp server. Key server. Key.old
  2. openssl rsa -in server. Key.org -out server. Key

Create server certificate

Openssl x509 -req -days 365 -in  server.csr -sign.key -out server.crt

Now make some changes to squid.conf file

  1. http_port 3128 transparent
  2. https_port 3130 transparent cert=/”path to server.crt” key=/”path to server.key”.

Another easy way to create certificates and public key private key pair is using genkey utility. In order to use that you have crypto-utils package install on your machine.

Steps are:

  1. #yum -y install crypto-utils
  2. genkey -days 365 squidserver.hostname.com
  3. Hit next.
  4. Select number of bits for data encryption. Default is 1024. This command will generate random bits.
  5. Generate the certificate.
  6. I will suggest you to never used passphrase for key, because if u assigns passphrase to key then along with public key we need to share passphrase.
  7. Certificate and key are stored at /etc/pki/tls/certs/ and /etc/pki/tls/private/
  8. In squid.conf make necessary change like this

http_port 3128 transparent

https_port 3130 transparent cert=/etc/pki/tls/certs/squidserver.hostname.com.crt key=/etc/pki/tls/private/squidserver.hostname.com.key.

WP Twitter Auto Publish Powered By : XYZScripts.com