Requirement: Vacation, Sendmail, SquirrelMail, SquirrelMail Local User Autoresponder and Mail Forwarder plugin, SquirrelMail Compatibility plugin, vsftp and CentOS 5
1. Download vacation-1.2.6.3.tar.gz from the link below: –
http://vacation.sourceforge.net2. Extract the vacation to a temporary directory as below: –
tar xvfz vacation-1.2.6.3.tar.gz -C /tmp3. Change directory to /tmp/vacation-1.2.6.3 as below: –
cd /tmp/vacation-1.2.6.34. Run the “make” command as below: –
make5. Copy the “vacation” binary to “/usr/bin” as below: –
cp vacation /usr/bin6. Create a softlink in the Sendmail’s restricted shell utility “smrsh” as below: –
cd /etc/smrsh
ln -s /usr/bin/vacation vacation7. Next, lets proceed with installing and configuring SquirrelMail’s Local User Autoresponder and Mail Forwarder Plugin. Download local_autorespond_forward-3.0-1.4.0.tar.gz from the link below: –
http://www.squirrelmail.org/plugin_view.php?id=2648. Extract the local_autoresponder_forward to SquirrelMail’s plugin directory (in CentOS 5) as below: –
tar xvfz local_autorespond_forward-3.0-1.4.0.tar.gz -C /usr/share/squirrelmail/plugins9. Download the Compatibility plugin from the link below: –
http://www.squirrelmail.org/plugin_view.php?id=15210. Extract the compatibility plugin to SquirrelMail’s plugin directory (in CentOS 5) as below: –
tar xvfz compatibility-2.0.8-1.0.tar.gz -C /usr/share/squirrelmail/plugins11. Run the SquirrelMail’s config command as below: –
cd /usr/share/squirrelmail/config
./conf.pl12. Patch your SquirrelMail according to your version as below: –
patch -p0 < patches/compatibility_patch-1.4.8.diff13. In SquirrelMail Configuration Main Menu, key-in “8″ to enter Plugins menu. Next, key-in the number that refer to “local_autorespond_forward” to install the plugin
14. Create the local_autorespond_forward configuration file as below: –
cd /usr/share/squirrelmail/plugin/local_autorespond_forward
cp config.php.sample config.php15. Edit the config.php file and change the following as below: –
$ftp_passive = 1;16. Next, you need to enable the vsftp service in init level 3, 4 and 5 as below: –
chkconfig --level 345 vsftp on17. Let’s start the vsftp service as below: –
service vsftp startYou can now begin to use the SquirrelMail’s local_autorespond_forward plugin to configure the vacation email responder for Sendmail.
FreeBSD- fetch-mail not scheduled
Fetchmail in my freebsd mail server not seems to be scheduled
got this fix
fetchmail -d 360 -f /usr/local/etc/fetchmailrc
-d – fetchmail will work as a daemon
360 – run every 360 seconds
-f – refer to conf file
mdadm – software raid lost after reboot- solved
mdadm doesn’t record the raid settings automatically, after you set everything up, you have to remember to save the mdadm.conf file.
Anyway, I forgot to do that, and on reboot, it hung my machine
So here is how I recovered it.
originally, my stripe was created with:
and so I was able to recreate the stripe using:
and then mount it with:
so then I saved the /etc/mdadm.conf file with:
mdadm –detail –scan >> /etc/mdadm.conf
So before adding it back into my /etc/fstab, I reboot, and check that I can mount it
and if that works (it did), I add back into /etc/fstab
and reboot again.
Free up inactive memory in Mac OSX Mountain Lion
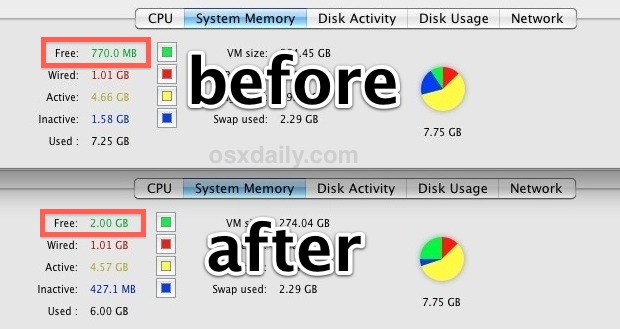
Mac OS X has fairly good memory management but it’s not perfect, and sometimes RAM can be held unnecessarily in the “inactive” state despite the contents no longer being needed. If you’ve been participating in memory heavy activities or you just need to free up some available RAM you can actually force Mac OS X to clear out inactive memory.
- Launch Terminal, found in /Applications/Utilities/ and enter the following command
purge
- Give OS X a minute or two to complete the process
Open Activity Monitor to see the before and after results yourself, you’ll find dramatic changes at the “Free”, “Used”, and “Inactive” meters under System Memory.
how to install apt-get in Centos / Redhat
You may have noticed that “yum install apt” results in “nothing to do.” However, you can install it using YUM (centos uses YUM instead of APT). Since it requires downloading from a third party source (RPMforge). Please do so at your own risk.
Download and install the rpm forge release, which will enable YUM to access:
wget http://packages.sw.be/rpmforge-release/rpmforge-release-0.3.6-1.el5.rf.i386.rpm
rpm -i rpmforge-release-0.3.6-1.el5.rf.i386.rpm
After this is installed (it takes a long time), you can install APT.
You should now be able to use apt-get and install the apt repositories. You will have to add your sources at /etc/apt/sources.list.d


