How to Install Zpanel in Centos 5

The following are the steps to install CentOS 5.5+

1. Download the source from the following Url using the command:

#wget https://xsdou.googlecode.com/files/zpanel-6.1.1.tar.gz

2. Create a directory as below:

#mkdir /etc/zpanel

3. Extract the source to /etc/zpanel:

#tar -zxvf zpanel-6.1.1.tar.gz -C /etc/zpanel/

4. Change mod using the following command:

#chmod +x /etc/zpanel/lib/dev/zpinstall_centos.sh

5. Finally, run the following command and follow the screen instructions.

#/etc/zpanel/lib/dev/zpinstall_centos.sh

This will download and install all the required dependencies (Apache, PHP, Postfix etc.) as well as setup and install the entire environment.

Resize LVM partition CentOs 5 -reduce swap and extend /

This only work in a situation where you need to take some space from swap and add to /


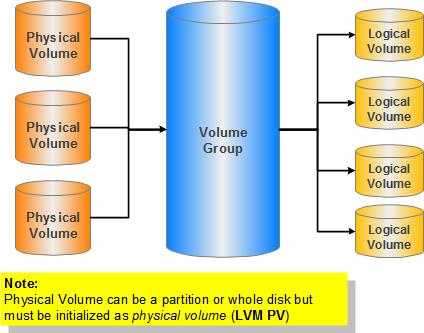
LVM is a logical volume manager for the Linux kernel; it manages disk drives and similar mass-storage devices, in particular large ones. The term “volume” refers to a disk drive or partition thereof.

Before we start just some general housekeeping. The XEN virtual CentOS 5.5 server (base install) in this tutorial was assigned 10GB of storage with the default partitioning layout.

Let check the amount of disk space available on the file system.

# df -h
Filesystem Size Used Avail Use% Mounted on
/dev/mapper/VolGroup00-LogVol00
4.9G 2.4G 2.3G 51% /
/dev/xvda1 99M 23M 72M 25% /boot
tmpfs 4.0G 0 4.0G 0% /dev/shm

Let see the attributes of the logical volumes like size, read/write status, snapshot information

# lvdisplay
— Logical volume —
LV Name /dev/VolGroup00/LogVol00
VG Name VolGroup00
LV UUID oFXKGg-nBPo-Fk27-3ino-zaHZ-cEcv-fk0dS0
LV Write Access read/write
LV Status available
# open 1
LV Size 5.00 GB
Current LE 160
Segments 1
Allocation inherit
Read ahead sectors auto
– currently set to 256
Block device 253:0

— Logical volume —
LV Name /dev/VolGroup00/LogVol01
VG Name VolGroup00
LV UUID Ntffw7-dqPh-Rjhy-rWLv-BGA0-iGik-LoyHET
LV Write Access read/write
LV Status available
# open 1
LV Size 4.88 GB
Current LE 156
Segments 1
Allocation inherit
Read ahead sectors auto
– currently set to 256
Block device 253:1

Let’s begin but first turning off swap on the Swap Logical Volume

# swapoff /dev/VolGroup00/LogVol01

Once swap is off let’s take the disk space we require.

# lvresize -L -4GB /dev/VolGroup00/LogVol01
WARNING: Reducing active logical volume to 896.00 MB
THIS MAY DESTROY YOUR DATA (filesystem etc.)
Do you really want to reduce LogVol01? [y/n]: y
Reducing logical volume LogVol01 to 896.00 MB
Logical volume LogVol01 successfully resized

Now let’s add what we removed to the main Logical Volume.

# lvresize -L +4GB /dev/VolGroup00/LogVol00
Extending logical volume LogVol00 to 9.00 GB
Logical volume LogVol00 successfully resized

Resize the File System

# resize2fs -p /dev/VolGroup00/LogVol00
resize2fs 1.39 (29-May-2006)
Filesystem at /dev/VolGroup00/LogVol00 is mounted on /; on-line resizing required
Performing an on-line resize of /dev/VolGroup00/LogVol00 to 2359296 (4k) blocks.
The filesystem on /dev/VolGroup00/LogVol00 is now 2359296 blocks long.

Rebuild the swap partition.

# mkswap /dev/VolGroup00/LogVol01
Setting up swapspace version 1, size = 939520 kB

Turn swap on.

# swapon /dev/VolGroup00/LogVol01

Let’s check the amount of disk space available and LVM attributes to see if our changes took effect.

# df -h
Filesystem Size Used Avail Use% Mounted on
/dev/mapper/VolGroup00-LogVol00
8.8G 2.4G 6.0G 28% /
/dev/xvda1 99M 23M 72M 25% /boot
tmpfs 4.0G 0 4.0G 0% /dev/shm

# lvdisplay
— Logical volume —
LV Name /dev/VolGroup00/LogVol00
VG Name VolGroup00
LV UUID oFXKGg-nBPo-Fk27-3ino-zaHZ-cEcv-fk0dS0
LV Write Access read/write
LV Status available
# open 1
LV Size 9.00 GB
Current LE 288
Segments 2
Allocation inherit
Read ahead sectors auto
– currently set to 256
Block device 253:0

— Logical volume —
LV Name /dev/VolGroup00/LogVol01
VG Name VolGroup00
LV UUID Ntffw7-dqPh-Rjhy-rWLv-BGA0-iGik-LoyHET
LV Write Access read/write
LV Status available
# open 1
LV Size 896.00 MB
Current LE 28
Segments 1
Allocation inherit
Read ahead sectors auto
– currently set to 256
Block device 253:1

Courtesy: http://www.how2centos.com/centos-lvm-resizing-guide/#ixzz2Q2S3xZOd

how to fix broken YUM in CentOS

When we type the command yum, we encounter the error such as the one below.

# yum update
Loaded plugins: downloadonly, fastestmirror
Loading mirror speeds from cached hostfile
Traceback (most recent call last):
  File "/usr/bin/yum", line 29, in ?
    yummain.user_main(sys.argv[1:], exit_code=True)
  File "/usr/share/yum-cli/yummain.py", line 309, in user_main
    errcode = main(args)
  File "/usr/share/yum-cli/yummain.py", line 178, in main
    result, resultmsgs = base.doCommands()
  File "/usr/share/yum-cli/cli.py", line 345, in doCommands
    self._getTs(needTsRemove)
  File "/usr/lib/python2.4/site-packages/yum/depsolve.py", line 101, in _getTs
    self._getTsInfo(remove_only)
  File "/usr/lib/python2.4/site-packages/yum/depsolve.py", line 112, in _getTsIn                                                                             fo
    pkgSack = self.pkgSack
  File "/usr/lib/python2.4/site-packages/yum/__init__.py", line 661, in 
    pkgSack = property(fget=lambda self: self._getSacks(),
  File "/usr/lib/python2.4/site-packages/yum/__init__.py", line 501, in _getSack                                                                             s
    self.repos.populateSack(which=repos)
  File "/usr/lib/python2.4/site-packages/yum/repos.py", line 232, in populateSac                                                                             k
    self.doSetup()
  File "/usr/lib/python2.4/site-packages/yum/repos.py", line 79, in doSetup
    self.ayum.plugins.run('postreposetup')
  File "/usr/lib/python2.4/site-packages/yum/plugins.py", line 179, in run
    func(conduitcls(self, self.base, conf, **kwargs))
  File "/usr/lib/yum-plugins/fastestmirror.py", line 181, in postreposetup_hook
    all_urls = FastestMirror(all_urls).get_mirrorlist()
  File "/usr/lib/yum-plugins/fastestmirror.py", line 333, in get_mirrorlist
    self._poll_mirrors()
  File "/usr/lib/yum-plugins/fastestmirror.py", line 376, in _poll_mirrors
    pollThread.start()
  File "/usr/lib64/python2.4/threading.py", line 416, in start
    _start_new_thread(self.__bootstrap, ())
thread.error: can't start new thread

Possible Solution 1: (which solve my problem immediately). Modify the the following.

# yum clean all
# vim /etc/yum/pluginconf.d/fastestmirror.conf


enabled=0

Possible Solution 2: The good old yum clean all. (Clean everything)

# yum clean all
Loaded plugins: downloadonly, fastestmirror
Cleaning up Everything
Cleaning up list of fastest mirrors

Possible Solution 3: Rebuild the yum database

# yum clean all
# rm -f /var/lib/rpm/__db*
# rpm --rebuilddb
# yum update

Hope this help.


Courtesy: http://linuxtoolkit.blogspot.com/2012/02/how-to-fix-broken-yum-for-centos.html

Rebuild Initrd in Centos / Redhat

Boot in Rescue Mode

Please perform the following steps:

Boot from a CentOS installation disc (for example, CD #1 or DVD).
Type “linux rescue” at the “boot:” prompt.
Mount all filesystems in read-write mode.
Create the New Initrd

Change root to real root (‘/’) on your hard disk and make the initrd. (The example is for the latest CentOS 5.5 kernel, as of this writing. Modify it for your current kernel.)
mount –bind /proc /mnt/sysimage/proc
mount –bind /dev /mnt/sysimage/dev
mount –bind /sys /mnt/sysimage/sys
chroot /mnt/sysimage
cd /boot
mv initrd-2.6.18-194.32.1.el5.img initrd-2.6.18-194.32.1.el5.old.img
mkinitrd initrd-2.6.18-194.32.1.el5.img 2.6.18-194.32.1.el5

If you are migrating a physical machine to a virtual one using the Xen hypervisor, replace the last command above with:
mkinitrd –with-xenblk initrd-2.6.18-194.32.1.el5xen.img 2.6.18-194.32.1.el5xen

Many other options may be exercised, such as adding non-loaded modules manually. See man mkinitrd for details. It may be necessary to modify /boot/grub/grub.conf and/or /etc/fstab depending on the details of your installation. This depends on your use of LABEL and/or UUID versus physical devices in the files, and is too complex an issue to get into in any detail in a TipsAndTricks article.
Reboot
cd /
sync; sync; sync
telinit 6

CentOS 5.9 – remove php 5.1 and install 5.2 / 5.3


Centos 5.9 coming with php 5.1 and we really need to update


remove 5.1 using


# yum remove php php*

Installing PHP 5.2  / 5.3

Atomic repository (recommended)
The most convenient means is to use the Atomic repository. CentOS guru recommend that you use it instead of CentOS-Testing due to unstable test software.
Connect the repository:
wget -q -O – http://www.atomicorp.com/installers/atomic.sh | sh
Disable PHP 5.3 that is installed into the repository by default (SKIP THIS STEP IF YOU WANT TO INSTALL 5.3)
exclude = php*5.3*                   –  into [atomic] in the  vi /etc/yum.repos.d/atomic.repo file

Update PHP
yum install php php-mysql php-cgi


Once completed successfully, check PHP and its version:
php -v
php -m
Restart Apache
/etc/init.d/httpd restart


WP Twitter Auto Publish Powered By : XYZScripts.com