ls-command-list-one-file-per-line

When I am busy with bash scripts , often need the filename only


with ls  command you can populate file names only in different line and you can take the first one with head


ls  -1    # 1 is the number not the letter l

and get the first one by

ls -1 |head -1


html-tip-using-quotes-in-form-input-tags

In (X)HTML, attribute values should be enclosed by double or single quotes. But a common source of errors and confusion arises when those values themselves contain double or single quotes. This is especially common for form input fields, where the values might contain data obtained from a database or supplied previously by the user.

Yes, using " works:

<input type="text" name="last_name" value="&quot;My quote!&quot;" />


but another fix is using PhP - i found this with google search

Consider the case of an input text field for last name:

<input type=’text’ name=’last_name’ value=” />

Usually, attribute values are surrounded by double quotes, but single quotes are also allowed, and serve to highlight the pitfall here. Say that the value of the last name text field is taken from a database of users, and this particular user’s last name is “O’Reilly” – the PHP code will be:

<input type=’text’ name=’last_name’ value='<?php print $lastName; ?>’ />

And the HTML output will be:

<input type=’text’ name=’last_name’ value=’O’Reilly’ />

This will make the last name appear as just “0” in a browser, and will be sent as that when submitting the form. This is because the single quote in “O’Reilly” is taken as marking the end of the value. What we want is to encode the quote character so that HTML understands what we mean is the literal character for a single quote. The encoded version of a single quote is “&#39;”. The encoding can be done in a number of ways. For example, we can use the function str_replace() to replace all occurrences of “‘” with “&#39;”. But the most convenient and complete way is to use thehtmlentities() function on the $lastName variable, as in the following PHP code:

<input type=’text’ name=’last_name’ value='<?php print htmlentities($lastName, ENT_QUOTES); ?>’ />

Which will output:

<input type=’text’ name=’last_name’ value=’O&#39;Reilly’ />

Although “O’Reilly” is now not in its literal form in the HTML code, it will be displayed and sent properly from a form on an HTML page as seen in a browser.


preventing-brute-force-attacks-using-iptables-recent-matching

Software requirements

Linux kernel and iptables with ‘recent’ patch. (It seems that this patch has entered the mainline some time ago. ‘Recent’ matching e.g. is known to be included with kernels 2.4.31 and 2.6.8 ofDebian Sarge 4.0.)

Implementation

We begin with empty tables…

iptables -F

and add all the chains that we will use:

iptables -N ssh
iptables -N blacklist

Setup blacklist chain

One chain to add the remote host to the blacklist, dropping the connection attempt:

iptables -A blacklist -m recent --name blacklist --set
iptables -A blacklist -j DROP

The duration that the host is blacklisted is controlled by the match in the ssh chain.

Setup ssh chain

In the ssh chain, incoming connections from blacklisted hosts are dropped. The use of --update implies that the timer for the duration of blacklisting (600 seconds) is restarted every time an offending packet is registered. (If this behaviour is not desired, --rcheck may be used instead.)

iptables -A ssh -m recent --update --name blacklist --seconds 600 --hitcount 1 -j DROP

These rules are just for counting of incoming connections.

iptables -A ssh -m recent --set --name counting1
iptables -A ssh -m recent --set --name counting2
iptables -A ssh -m recent --set --name counting3
iptables -A ssh -m recent --set --name counting4

With the following rules, blacklisting is controlled using several rate limits. In this example, a host is blacklisted if it exceeds 2 connection attempts in 20 seconds, 14 in 200 seconds, 79 in 2000 seconds or 399 attempts in 20000 seconds.

iptables -A ssh -m recent --update --name counting1 --seconds 20 --hitcount 3 -j blacklist
iptables -A ssh -m recent --update --name counting2 --seconds 200 --hitcount 15 -j blacklist
iptables -A ssh -m recent --update --name counting3 --seconds 2000 --hitcount 80 -j blacklist
iptables -A ssh -m recent --update --name counting4 --seconds 20000 --hitcount 400 -j blacklist

The connection attempts that have survived this scrutiny are accepted:

iptables -A ssh -j ACCEPT

Setup INPUT chain

Allow packets that belong to existing connections:

iptables -A INPUT -m state --state RELATED,ESTABLISHED -j ACCEPT

Allow all packets from loopback interface:

iptables -A INPUT -i lo -j ACCEPT

Optionally we may allow all packets from certain friendly subnets. However this should be used sparingly and it should be kept in mind that hosts from friendly subnets may be compromised and out of a sudden be not so friendly anymore…

iptables -A INPUT -s aa.bb.cc.0/24 -j ACCEPT

Now we direct all incoming ssh connections to the chain of the same name:

iptables -A INPUT -p TCP --dport ssh -m state --state NEW -j ssh

What remains in this chain has no right to continue:

iptables -A INPUT -j DROP

Variations

  • Depending on personal taste, the check against the blacklist (first rule of ssh chain) might be moved to the top of the INPUT chain so that all communication (not only subsequent connection attempts) from the blacklisted host is blocked immediately.
  • Many other packet matching criteria might be conceived that would warrant putting the sender on the blacklist.
  • Identical or similar effects possibly may be achieved using different extensions to iptables.

Limitations

Denial of Service

The described method opens a DoS vulnerability that may be exploited using SYN-packets with fake sender address to disable ssh connections from a certain host. Therefore ‘recent’ matching should not be used, when the ability to connect to the machine from any location and at all times is mission-critical.

Also it should be mentioned, that the ssh daemon itself in its current implementation is vulnerable to DoS: There is an upper value for concurrent connections.

No substitute for secure passwords

The approach described here by no means is a substitute for using secure passwords that are difficult to guess and to brute-force! Disabling root logins in sshd is very much recommended! (Oh, by the way: There is also an option to disallow empty passwords for sshd. ;-) )

Security by Obscurity

It should be noted that this scheme partly employs methods of ‘security by obscurity’ to increase its effectivity. A casual attacker probably will be blocked for a long time (possibly forever) after several tries. Yet a determined, observant attacker still may try passwords at the rate specified by the counting4 rule. However this is still a considerable improvement compared to no limit at all.

how to turn off Auto-correct in iphone /ipad

Turn Off Autocorrect in iPhone

Autocorrect is a great iPhone feature if you text and/or email a lot. The ability to quickly type and have the smartphone complete words for you or correct grammatical mistakes helps write efficiently and quickly. Although autocorrect feature is great, it still doesn’t understand some local words and might get in the way of writing personal texts and emails especially when you are used to using certain phrases and words

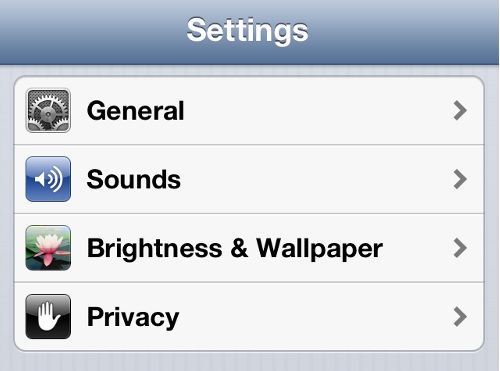
1. Open Settings

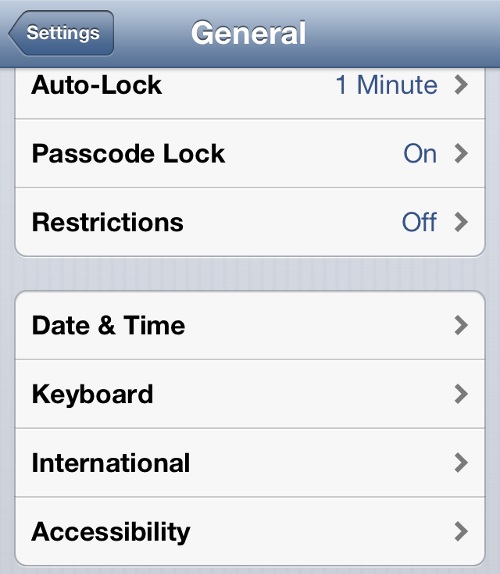
2. Choose General to see some of the most common statistics about your Apple iPhone and view important options.

iPhone Settings
iPhone Settings
3. Tap the Keyboard option to get to the Keyboard settings and turn off autocorrect in iPhone
iPhone General Settings

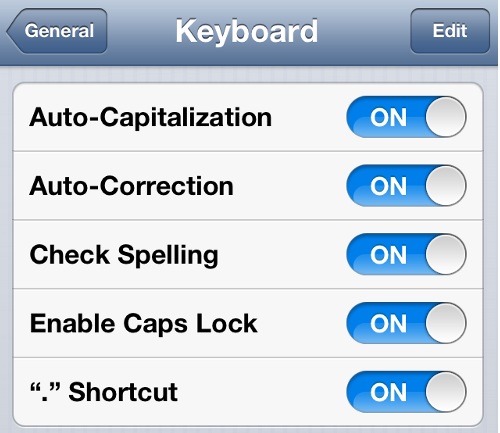
4. This will show you the current status of all the Keyboard settings.

iPhone Keyboard Settings

iPhone Keyboard Settings

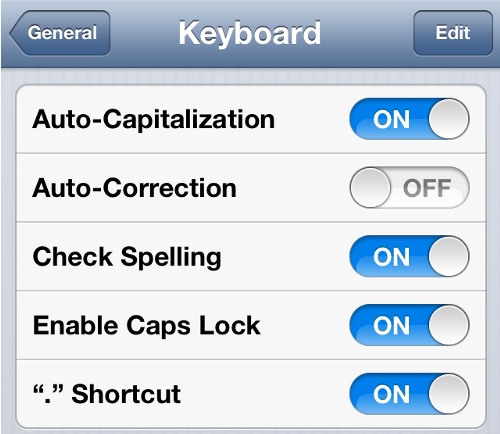
5. To turn off autocorrect in iPhone,  toggle the Auto-Correction status from ON to OFF. You have now turned off autocorrect in iPhone.

Turn Off Autocorrect in iPhone

Turn Off Autocorrect in iPhone

how to find Wifi signal strength- Mountain Lion OSX

To launch Wi-Fi Diagnostics, hold down the Option key as you click on the Wi-Fi icon in the menu bar. That’ll open the Wi-Fi menu with an Open Wi-Fi Diagnostics item at the bottom; click that item to open the utility. You can also launch the program directly from its hidey-hole: In the Finder, choose Go > Go to Folder, and enter /System/Library/CoreServices/. You’ll find the Wi-Fi Diagnostics app in there.

When it comes to helping you troubleshoot wireless networking problems, Mac OS X can’t seem to make up its mind. The old Network Utility was appropriate primarily for network gurus. OS X 10.4 came with Network Diagnostics, which took a user-friendlier hand-holding approach. Lion added Wi-Fi Diagnostics, but hid it away; it was largely intended to be used by AppleCare technicians or Apple Store Geniuses, who’d use it to generate detailed log reports. Now Mountain Lion comes with a network tool—a revised version of Wi-Fi Diagnostics—that’s once again intended for regular end users, not just network experts.

Wi-Fi Diagnostics can help you figure out why your Mac’s Wi-Fi adapter isn’t connecting to a network. It can also find nearby networks (which in turn can be useful for tracking down interference problems) and services broadcasting their availability via Bonjour. It also offers a graphical front end to some common Unix network tools, much as Network Utility did, but in a form that those without command-line experience can use.


WP Twitter Auto Publish Powered By : XYZScripts.com