Network interface settings – CentOS

Configuration of the “/etc/sysconfig/network-scripts/ifcfg-eth0” file

In this file, you would find your basic network device configuration. Here, ifcfg-eth0 is the first Ethernet device; ifcfg-eth1 would be the second Ethernet NIC (network interface card), and so forth. In this file, you can have quite a few settings.

Directives Required / Optional Expected Settings Comment
DEVICE= Required ethX You must have this entry specifying the Linux device name.
ONBOOT= Optional yes / no Start the device on boot? This will default to yes.
BOOTPROTO= Required static / dhcp / none Static hard set our IP, or do we want a dhcp assignment? “dhcp”, “none” is the same as static.
IPADDR= Optional IP address of machine The address we want if we are setting a static IP for the interface.
NETMASK= Optional Subnet mask Required for static IPs. The subnet mask.
NETWORK= Optional Network address Recommended for static IPs. The network that we are on.
BROADCAST= Optional Network broadcast address Recommended for static IPs. The broadcast address.
HWADDR= Optional Device MAC address The MAC address of our network card. Normally provided by the Anaconda installer at install time.
USERCTL= Optional yes / no Allow normal non-administrative user to take down and bring up the device. Defaults to “no”.
GATEWAY= Optional IP address of gateway The network gateway IP address.

Not all of these are necessary for proper operation, and the order they are in is irrelevant. I prefer to specify the additional directives of NETWORK and BROADCAST in my /etc/sysconfig/network-scripts/ifcfg-eth0 on machines that I want to have a hard-set IP address, mainly servers of any sort. If you want to use a DHCP-assigned address, your /etc/sysconfig/network-scripts/ifcfg-eth0 file would look something like this:

# Advanced Micro Devices [AMD] 79c970 [PCnet32 LANCE]
DEVICE=eth0
BOOTPROTO=dhcp
HWADDR=08:00:27:4B:3B:06
ONBOOT=yes

Mount NTFS partition in Linux

Mount NTFS partition in Linux

Mount NTFS partition in Redhat Enterpris Linux / Ubuntu Linux

Enterprise Linux distributions like Redhat Enterprise Linux ( RHEL ) does not provide native support to Windows NTFS partitions. However you may wand to mount a NTFS formated partiiton in your RHEL box. Here is a simple howto to mount NTFS partitions in your RHEL box.

First of all you need to install a couple of packages. You can use YUM for installing the packages. The rpmforge yum repo contains required rpm packages for mounting NTFS partitions on Linux server. The packages are fuse and fuse-ntfs-3g.

# yum install fuse fuse-ntfs-3g
Yes, you are done now you can mount ntfs partitions on your rhel server using the mount commandas follows.

# mount -t ntfs-3g /dev/device-name /mount-point

For example:
# mount -t ntfs-3g /dev/sdb1 /media

This one also works!!!!!

# mount.ntfs-3g /dev/sdb1 /media
Newer Ubuntu distributions like Ubuntu 10.04 LTS natively supports NTFS partiitons, so in a Ubuntu server you can mount NTFS partition by just using the above mount commnad.

cheat sheet – find command

1. Basic find command
# find -name “TestFile”

2. Find Files Using Name and Ignoring Case
# find -iname “TestFile”

3. Limit Search To Specific Directory Level Using mindepth and maxdepth
# find / -maxdepth 3 -name passwd
-maxdepth –> will go 3 directories below — / 1st; /etc 2nd; /usr/bin 3rd

# find / -mindepth 3 -maxdepth 5 -name passwd
will go 3 depths first and upto 5 — so will not disply under /; /usr; /usr/bin

4. Executing Commands on the Files Found by the Find Command.
user -exec {} /;
# find -iname “TestFile” -exec md5sum {} \;

5. Inverting the match.
To inver the match use the “-not” switch
# find / -not -iname “TestFile”

6. List inodes of the files
# ls -i1 test*
16187429 test-file-name
16187430 test-file-name

# find -inum 16187430 -exec mv {} new-test-file-name \;
# ls -i1 *test*
16187430 new-test-file-name
16187429 test-file-name

7. Find file based on the File-Permissions
You can :
* Find files that match exact permission
* Check whether the given permission matches, irrespective of other permission bits
* Search by giving octal / symbolic representation

# find . -perm -g=r -type f -exec ls -l {} \;
Will display all files with group permission read. Not files with readonly group permission

# find . -perm g=r -type f -exec ls -l {} \;
Will dispay files with 040 permission. i.e files with group read only permisison

# find . -perm 040 -type f -exec ls -l {} \;
Will dispay files with 040 permission. i.e files with group read only permisison

Setgid and Sticky bit in Linux

Special permissions on files and directories in linux are : SetUIDSetGID and Sticky bit.

With the help of “chmod” command  we can implement the special permissions on file and directories.

SUID / Set User ID : A program is executed with the file owner’s permissions (rather than with the permissions of the user who executes it).

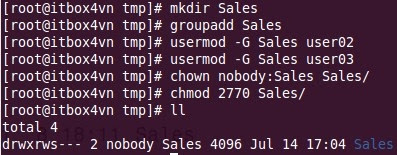
SGID / Set Group ID : Files created in the directory inherit its GID, i.e When a directory is shared between the users , and sgid is implemented on that shared directory , when these users creates  directory, then the created directory has the same gid or group owner of its parent directory.

Sticky Bit :  It is used mainly used on folders in order to avoid deletion of a folder and its content by other user though he/she is having write permissions. If Sticky bit is enabled on a folder, the folder is deleted by only owner of the folder and super user(root). This is a security measure to suppress deletion of critical folders where it is having full permissions by others.

When we implement these permissions ,we get the below symbols in permissions field :
Permissions
Meaning
–S—— SUID is set, but user (owner) execute is not set.
–s—— SUID and user execute are both set.
—–S— SGID is set, but group execute is not set.
—–s— SGID and group execute are both set.
——–T Sticky bit is set, bot other execute is not set.
——–t Sticky bit and other execute are both set.

SUID Example : passwd command
When normal user  try to change his/her  password  , passwd command is used ,  which is owned by root. This passwd command file will try to edit some system config files such as /etc/passwd, /etc/shadow etc. So passwd command is set with SUID to give root user permissions to normal user so that it can update /etc/shadow and other files.
Assign  suid to a File :

# chmod  u+s testfile.txt OR #  chmod 4750  testfile.txt

In this example , 4 indicates SUID bitset, 7 for full permissions for owner, 5 for write and execute permissions for group, and no permissions for others.

SGID Example :

# chmod g+s OR # chmod 2750 

Here in 2750, 2 indicates SGID bitset, 7 for full permissions for owner, 5 for write and execute permissions for group, and no permissions for others.

StickyBit Example : 

# chmod o+t /opt/ftp-data  or # chmod +t /opt/ftp-data OR # chmod 1757 /opt/ftp-dta

In this example , 1 indicates Sticky Bit set, 7 for full permissions for owner, 5 for read and execute permissions for group, and ful permissions for others.

Note : To check the special permissions , use these commands :

# ls   -l  

# ls -ld  

courtesy:http://foralllinux.blogspot.com

reset root password- ubuntu boot in single user mode

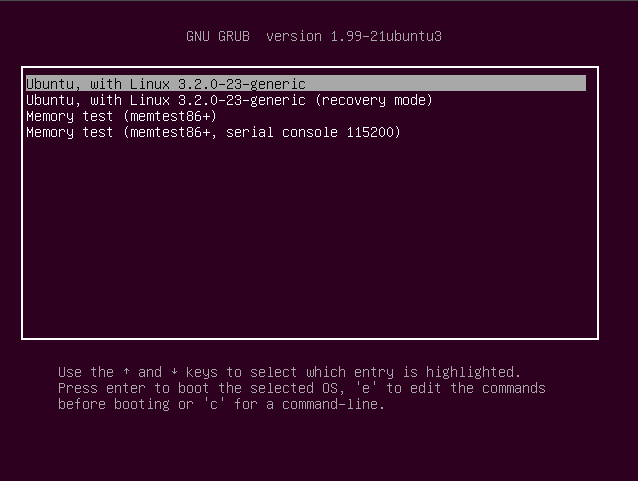
For that press down the “shift” key while booting and you will get the GRUB boot menu.

Normally the top GRUB entry will be pointing to your normal boot entries. It will look similar to:

grub-screen-1

Press the ‘e’ key to edit the kernel parameters.

Now what you see are the boot entries. Now find the kernel line and append “init=/bin/bash” to it.
Look near the bottom of the list of commands for lines similar to
linux /boot/vmlinuz-3.2.0-24-generic root=UUID=bc6f8146-1523-46a6-8b\
6a-64b819ccf2b7 ro quiet splash
replace ro quiet spash with   rw init=/bin/bash
linux /boot/vmlinuz-3.2.0-24-generic root=UUID=bc6f8146-1523-46a6-8b\
6a-64b819ccf2b7 rw init=/bin/bash
Press either Ctrl+X or F10 to boot using these kernel options.

mount -n -o remount,rw /

Now changing the root password is a piece of cake!!! just type in:

passwd root

WP Twitter Auto Publish Powered By : XYZScripts.com