stop adobe calling home and stop activation check for cs4 and cs5

stop adobe calling home and stop activation check for cs4 and cs5

stop adobe calling home and stop  activation check for cs4 and cs5


For MAC users

Step 1: Enable the root user


  1. Choose Apple menu > System Preferences, and then click Users & Groups.
  2. Click the lock icon to unlock it, and then type an administrator name and password.
  3. In the Network Account Server section, click Join or Edit.
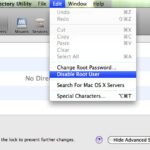
  4. Click Open Directory Utility.
  5. Click the lock icon to unlock it, and then enter your administrator name and password.
  6. Choose Edit > Enable Root User, and then enter a root user password in the Password and Verify fields.Be sure to specify a secure password.

Step 2:

open terminal

macbook-pro-2:~ ajay$ su
Password:
sh-3.2#

sh-3.2# vi /private/etc/hosts

paste these items

127.0.0.1 activate.adobe.com
127.0.0.1 practivate.adobe.com
127.0.0.1 ereg.adobe.com
127.0.0.1 activate.wip3.adobe.com
127.0.0.1 wip3.adobe.com
127.0.0.1 3dns-3.adobe.com
127.0.0.1 3dns-2.adobe.com
127.0.0.1 adobe-dns.adobe.com
127.0.0.1 adobe-dns-2.adobe.com
127.0.0.1 adobe-dns-3.adobe.com
127.0.0.1 ereg.wip3.adobe.com
127.0.0.1 activate-sea.adobe.com
127.0.0.1 wwis-dubc1-vip60.adobe.com
127.0.0.1 activate-sjc0.adobe.com
127.0.0.1 hl2rcv.adobe.com
127.0.0.1 192.150.14.69
127.0.0.1 192.150.18.101
127.0.0.1 192.150.18.108
127.0.0.1 192.150.22.40
127.0.0.1 192.150.8.100
127.0.0.1 192.150.8.118
127.0.0.1 209-34-83-73.ood.opsource.net
127.0.0.1 3dns-1.adobe.com
127.0.0.1 3dns-2.adobe.com
127.0.0.1 3dns-3.adobe.com
127.0.0.1 3dns-4.adobe.com
127.0.0.1 3dns.adobe.com
127.0.0.1 activate-sea.adobe.com
127.0.0.1 activate-sjc0.adobe.com
127.0.0.1 activate.adobe.com
127.0.0.1 activate.wip.adobe.com
127.0.0.1 activate.wip1.adobe.com
127.0.0.1 activate.wip2.adobe.com
127.0.0.1 activate.wip3.adobe.com
127.0.0.1 activate.wip4.adobe.com
127.0.0.1 adobe-dns-1.adobe.com
127.0.0.1 adobe-dns-2.adobe.com
127.0.0.1 adobe-dns-3.adobe.com
127.0.0.1 adobe-dns-4.adobe.com
127.0.0.1 adobe-dns.adobe.com
127.0.0.1 adobe.activate.com
127.0.0.1 adobeereg.com
127.0.0.1 crl.verisign.net
127.0.0.1 CRL.VERISIGN.NET.*
127.0.0.1 ereg.adobe.com
127.0.0.1 ereg.wip.adobe.com
127.0.0.1 ereg.wip1.adobe.com
127.0.0.1 ereg.wip2.adobe.com
127.0.0.1 ereg.wip3.adobe.com
127.0.0.1 ereg.wip4.adobe.com
127.0.0.1 hl2rcv.adobe.com
127.0.0.1 ood.opsource.net
127.0.0.1 practivate.adobe
127.0.0.1 practivate.adobe.*
127.0.0.1 practivate.adobe.com
127.0.0.1 practivate.adobe.ipp
127.0.0.1 practivate.adobe.newoa
127.0.0.1 practivate.adobe.ntp
127.0.0.1 tss-geotrust-crl.thawte.com
127.0.0.1 wip.adobe.com
127.0.0.1 wip1.adobe.com
127.0.0.1 wip2.adobe.com
127.0.0.1 wip3.adobe.com
127.0.0.1 wip4.adobe.com
127.0.0.1 wwis-dubc1-vip60.adobe.com

Step3:

close with :wq

step 4: flush DNS

dscacheutil -flushcache

done


For Windows users 

open C:\WINDOWS\system32\drivers\etc\hosts with notepad and paste the items in step 2 at the end:

Enjoy – stop adobe calling home and stop  activation check for cs4 and cs5


import contacts from your linkedin Account

Step ONE: Export Your Contacts to a CSV file

  1. After you are logged into LinkedIn, click on Contacts at the top menu,
  2. On that page, towards the bottom, you’ll see a link that says “Export Contacts.”  Click that.
  3. From that page you simply follow the process… I leave it as the default file format (there are three csv options – it really doesn’t matter which one you choose).

That’s it – it is really that easy to export your contacts from LinkedIn!  The hardest part of this is knowing where your file was saved to… but you should know how to find it.

Step TWO: Clean and prepare the file

  1. Open the csv file in Excel.
  2. Optional:  I delete all of the columns with blank data.  I just did checked… right now there are FIFTY FIVE(!) columns that had a header but no data… delete all of these.
  3. Optional, but easier to do it here than one-by-one in JibberJobber: I go through the first and last names and clean them up.  I take out things like middle initial, acronyms, email addresses (from those fields), etc.  I simply want a first and last name.  This is the most time-consuming part of the process.
  4. Optional, but HIGHLY recommended: Add a few other fields, including Tags (LinkedIn allows you to tag contacts, but they don’t export them), Notes (they have a Notes column, but no data in it), Source (I always put LI_Import as the source, for every single record, to know where that record came from), Ranking, and anything else you want to import.

leave a copy of message in server – Microsoft outlook 2010

Changing the Outlook settings

To leave messages on the server, you will:

  • Open the Advanced settings window for your mail account
  • Change the length of time that Outlook 2010 stores messages on the server.

1. Start the Microsoft Outlook program.

Use the Start menu to start Outlook.

When it opens, click the File tab and select the account for your e-mail address if it’s not already chosen:

Outlook 2010 select account

2. Click “Account Settings”.

After making sure your e-mail address is selected, click the Account Settings button to open the settings window:

Outlook 2010 "Account Settings"

3. Choose the account and click “Change”.

Make sure your e-mail address is selected, then click Change.

screen shot

4. The “Change Account” window opens.

Click the More Settings button:

screen shot

5.The “Internet E-mail Settings” window appears.

Choose the Advanced tab.

In the “Advanced” tab, make sure that Leave a copy of messages on the server is checked. Then change the “14” to the number of days you want to leave messages on our servers:

Outlook 2010 "leave messages on server" settings

You can also uncheck the Remove from server after X days checkbox completely — but if you leave messages on the server forever, it can eventually slow down your mail connections and use up your disk space allowance. So we recommend choosing a number of days that’s long enough that you’ll be able to read the messages in your other mail program (or Webmail). In terms of performance, even using a large number such as 365 days is better than not checking this box.

If you check Remove from server when deleted from ‘Deleted Items’, the messages will be deleted when you delete them in Outlook. This may be useful if you’re trying to keep your Webmail box (sort-of) in sync with Outlook without using IMAP, but you shouldn’t choose it if you’re leaving messages on our servers to be backed up.

5. Click OK to close the “Internet E-mail Settings” window.

After you close the “Internet E-mail Settings” window, the “Change Account” screen will still be visible.

6. Test the settings.

Click Next. Outlook will test the settings, then should tell you that “all tests completed successfully”:

Outlook 2010 success window

If Outlook tells you a test failed, double-check to be sure you’ve entered the settings correctly.

If the “Test Account Settings” window is still open, close it to continue.


original post from – support.tigertech.net/outlook-2010


Install remi repository for yum centos

Enable the remi repository

The remi repository provides a variety of up-to-date packages that are useful or are a requirement for many popular web-based services. That means it generally is not a bad idea to enable the remi repositories by default.

First, open the /etc/yum.repos.d/remi.repo repository file using a text editor of your choice:

sudo vim /etc/yum.repos.d/remi.repo
Edit the [remi] portion of the file so that the enabled option is set to 1. This will enable the remi repository.

name=Les RPM de remi pour Enterprise Linux $releasever – $basearch
#baseurl=http://rpms.famillecollet.com/enterprise/$releasever/remi/$basearch/
mirrorlist=http://rpms.famillecollet.com/enterprise/$releasever/remi/mirror
enabled=1
gpgcheck=1
gpgkey=file:///etc/pki/rpm-gpg/RPM-GPG-KEY-remi
failovermethod=priority

install ntp centos

Login as the root user

Type the following command to install ntp
# yum install ntp

Turn on service
# chkconfig ntpd on

Synchronize the system clock with pool.ntp.org server:
# ntpdate 0.centos.pool.ntp.org

Start the NTP:
# /etc/init.d/ntpd start

WP Twitter Auto Publish Powered By : XYZScripts.com