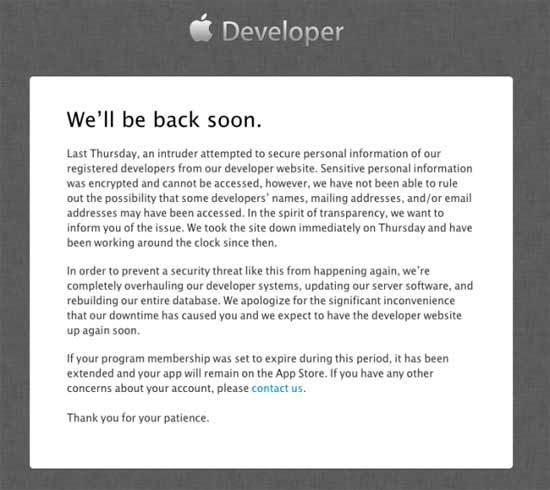
apple developers site got hacked

A Turkish security research, Ibrahim Balic, claims that he was behind the “hack” but insisted that his intention was to demonstrate that Apple’s system was leaking user information. He posted a video on Youtube which appears to show that the site was vulnerable to an attack, but adding “I have reported all the bugs I found to the company and waited for approval.” A screenshot in the video showed a bug filed on 19 July – the same day the site was taken down – saying “Data leaks user information. I think you should fix it as soon as possible.”

Apple said in an email to developers late on Sunday night that “an intruder attempted to secure personal information of our registered developers… [and] we have not been able to rule out the possibility that some developers’ names, mailing addresses and/or email addresses may have been accessed.”

It didn’t give any indication of who carried out the attack, or what their purpose might have been. Apple said it is “completely overhauling our developer systems, updating our server software, and rebuilding our entire database [of developer information].”


read more in guardian.co.uk –

http://www.guardian.co.uk/technology/2013/jul/22/apple-developer-site-hacked

Ubuntu Forums Hacked, 1.8 Million Passwords, E-Mails & Usernames Stolen

While data from the Forums has been compromised they stress that other services, such as Ubuntu One and Launchpad, ‘are not affected by the breach’.

current home screen of http://ubuntuforums.org/

Ubuntu Forums is down for maintenance

There has been a security breach on the Ubuntu Forums. The Canonical IS team is working hard as we speak to restore normal operations. This page will be updated regularly with progress reports.

What we know

  • Unfortunately the attackers have gotten every user’s local username, password, and email address from the Ubuntu Forums database.
  • The passwords are not stored in plain text, they are stored as salted hashes. However, if you were using the same password as your Ubuntu Forums one on another service (such as email), you are strongly encouraged to change the password on the other service ASAP.
  • Ubuntu One, Launchpad and other Ubuntu/Canonical services are NOT affected by the breach.

Progress report

  • 2013-07-20 2011UTC: Reports of defacement
  • 2013-07-20 2015UTC: Site taken down, this splash page put in place while investigation continues.

If you’re using Ubuntu and need technical support please see the following page for support:


If you’re looking for a place to discuss Ubuntu, in the meantime we encourage you to check out these sites:


Install and configure DNS bind chroot in centos 6

1. Install Bind Chroot DNS server :

[root@centos64 ~]# yum install bind-chroot bind -y

2. Copy all bind related files to prepare bind chrooted environments :

[root@centos64 ~]# cp -R /usr/share/doc/bind-*/sample/var/named/* /var/named/chroot/var/named/

3. Create bind related files into chrooted directory :

[root@centos64 ~]# touch /var/named/chroot/var/named/data/cache_dump.db
[root@centos64 ~]# touch /var/named/chroot/var/named/data/named_stats.txt
[root@centos64 ~]# touch /var/named/chroot/var/named/data/named_mem_stats.txt
[root@centos64 ~]# touch /var/named/chroot/var/named/data/named.run
[root@centos64 ~]# mkdir /var/named/chroot/var/named/dynamic
[root@centos64 ~]# touch /var/named/chroot/var/named/dynamic/managed-keys.bind

4. Bind lock file should be writeable, therefore set the permission to make it writable as below :

[root@centos64 ~]# chmod -R 777 /var/named/chroot/var/named/data
[root@centos64 ~]# chmod -R 777 /var/named/chroot/var/named/dynamic

5. Set if you do not use IPv6 :

[root@centos64 ~]# echo 'OPTIONS="-4"' >> /etc/sysconfig/named

6. Copy /etc/named.conf chrooted bind config folder :

[root@centos64 ~]# cp -p /etc/named.conf /var/named/chroot/etc/named.conf

7.Configure main bind configuration in /etc/named.conf. Append the ehowstuff.local information to the file :

[root@centos64 ~]# vi /var/named/chroot/etc/named.conf

a. Add bind DNS IP addresses :

..
listen-on port 53 { 127.0.0.1;192.168.2.62;192.168.2.63; };
..

b. Create forward and reverse zone :

..
..
zone "ehowstuff.local" {
    type master;
    file "ehowstuff.local.zone";
};

zone "2.168.192.in-addr.arpa" IN {
        type master;
        file "192.168.2.zone";
};
..
..

Full configuration for named.conf :

//
// named.conf
//
// Provided by Red Hat bind package to configure the ISC BIND named(8) DNS
// server as a caching only nameserver (as a localhost DNS resolver only).
//
// See /usr/share/doc/bind*/sample/ for example named configuration files.
//

options {
        listen-on port 53 { 127.0.0.1;192.168.2.62;192.168.2.63; };
        listen-on-v6 port 53 { ::1; };
        directory       "/var/named";
        dump-file       "/var/named/data/cache_dump.db";
        statistics-file "/var/named/data/named_stats.txt";
        memstatistics-file "/var/named/data/named_mem_stats.txt";
        allow-query     { localhost; };
        recursion yes;

        dnssec-enable yes;
        dnssec-validation yes;
        dnssec-lookaside auto;

        /* Path to ISC DLV key */
        bindkeys-file "/etc/named.iscdlv.key";

        managed-keys-directory "/var/named/dynamic";
};

logging {
        channel default_debug {
                file "data/named.run";
                severity dynamic;
        };
};

zone "." IN {
        type hint;
        file "named.ca";
};

zone "ehowstuff.local" {
    type master;
    file "ehowstuff.local.zone";
};

zone "2.168.192.in-addr.arpa" IN {
        type master;
        file "192.168.2.zone";
};

include "/etc/named.rfc1912.zones";
include "/etc/named.root.key";

8. Create Forward and Reverse zone files for domain ehowstuff.local.

a) Create Forward Zone :

[root@centos64 ~]# vi /var/named/chroot/var/named/ehowstuff.local.zone
;
;       Addresses and other host information.
;
@       IN      SOA     ehowstuff.local. hostmaster.ehowstuff.local. (
                               2013042201      ; Serial
                               43200      ; Refresh
                               3600       ; Retry
                               3600000    ; Expire
                               2592000 )  ; Minimum

;       Define the nameservers and the mail servers

               IN      NS      ns1.ehowstuff.local.
               IN      NS      ns2.ehowstuff.local.
               IN      A       192.168.2.62
               IN      MX      10 mail.ehowstuff.local.

centos64           IN      A       192.168.2.62
mail            IN      A       192.168.2.62
ns1              IN      A       192.168.2.62
ns2              IN      A       192.168.2.63

b) Create Reverse Zone :

[root@centos64 ~]# vi /var/named/chroot/var/named/192.168.2.zone
;
;       Addresses and other host information.
;
@       IN      SOA     ehowstuff.local. hostmaster.ehowstuff.local. (
                               2013042201      ; Serial
                               43200      ; Refresh
                               3600       ; Retry
                               3600000    ; Expire
                               2592000 )  ; Minimum

2.168.192.in-addr.arpa. IN      NS      centos64.ehowstuff.local.

62.2.168.192.in-addr.arpa. IN PTR mail.ehowstuff.local.
62.2.168.192.in-addr.arpa. IN PTR ns1.ehowstuff.local.
63.2.168.192.in-addr.arpa. IN PTR ns2.ehowstuff.local.

9. Start Bind service :

[root@centos64 ~]# /etc/init.d/named start
Generating /etc/rndc.key:                                  [  OK  ]
Starting named:                                            [  OK  ]

10. Configure Bind auto start at boot :

[root@centos64 ~]# chkconfig --levels 235 named on

11. Test and verify Bind DNS setup :
a. Test and verify using host command :

[root@centos64 ~]# host -t ns ehowstuff.local
ehowstuff.local name server ns1.ehowstuff.local.
ehowstuff.local name server ns2.ehowstuff.local.
[root@centos64 ~]# host -t mx ehowstuff.local
ehowstuff.local mail is handled by 10 mail.ehowstuff.local.

b. Test and verify using nslookup command :

[root@centos64 ~]# nslookup
> set type=any
> ehowstuff.local
Server:         192.168.2.62
Address:        192.168.2.62#53

ehowstuff.local
        origin = ehowstuff.local
        mail addr = hostmaster.ehowstuff.local
        serial = 2013042201
        refresh = 43200
        retry = 3600
        expire = 3600000
        minimum = 2592000
ehowstuff.local nameserver = ns1.ehowstuff.local.
ehowstuff.local nameserver = ns2.ehowstuff.local.
Name:   ehowstuff.local
Address: 192.168.2.62
ehowstuff.local mail exchanger = 10 mail.ehowstuff.local.
> exit

c. Test and verify using dig command :

[root@centos64 ~]# dig ehowstuff.local

; < <>> DiG 9.8.2rc1-RedHat-9.8.2-0.17.rc1.el6_4.4 < <>> ehowstuff.local
;; global options: +cmd
;; Got answer:
;; ->>HEADER< <- opcode: QUERY, status: NOERROR, id: 6958
;; flags: qr aa rd ra; QUERY: 1, ANSWER: 1, AUTHORITY: 2, ADDITIONAL: 2

;; QUESTION SECTION:
;ehowstuff.local.               IN      A

;; ANSWER SECTION:
ehowstuff.local.        2592000 IN      A       192.168.2.62

;; AUTHORITY SECTION:
ehowstuff.local.        2592000 IN      NS      ns1.ehowstuff.local.
ehowstuff.local.        2592000 IN      NS      ns2.ehowstuff.local.

;; ADDITIONAL SECTION:
ns1.ehowstuff.local.    2592000 IN      A       192.168.2.62
ns2.ehowstuff.local.    2592000 IN      A       192.168.2.63

;; Query time: 1 msec
;; SERVER: 192.168.2.62#53(192.168.2.62)
;; WHEN: Wed Apr  3 00:03:40 2013
;; MSG SIZE  rcvd: 117


courtesy: ehowstuff.com/how-to-install-and-configure-bind-chroot-dns-server-on-centos-6-4-vps/

configuration of network

Configure network interface in Centos

make sure your OS detected network card

# dmesg |grep eth
eth0: RealTek RTL8139 at 0xf8cee000, 50:67:f0:5e:ac:2f, IRQ 21

edit network configuration file for eth0

# vim /etc/sysconfig/network-scripts/ifcfg-eth0

# Realtek Semiconductor Co., Ltd. RTL-8139/8139C/8139C+
DEVICE=eth0
BOOTPROTO=static

HWADDR=50:67:F0:5E:AC:2F
ONBOOT=yes
IPADDR=192.168.0.1
NETWORK=192.168.0.0
BROADCAST=192.168.0.255
NETMASK=255.255.255.0

restart network service

# service network restart

or

# /etc/init.d/network restart

Post by mail to your wordpress blog

Post by Email is a way of publishing posts on your blog by email. Any email client can be used to send the email, allowing you to publish quickly and easily from devices such as cell phones.

Generating a Post by Email Address

Before you can publish by email, you must generate a special email address. This address is unique to you and must be kept secret (anyone that knows the email address can publish a post to your blog). If there are multiple authors on the blog, each person must connect separately to get a separate special email address.

  1. Make sure that the Post by Email module is activated in Jetpack.
  2. Make sure that your user account is connected in WordPress.com
  3. Go to Users -> Your Profile.
  4. Locate the Post by Email section.
  5. Click the “Enable Post by Email” button.

You now have a special email address to use for your blog.

Sending Emails

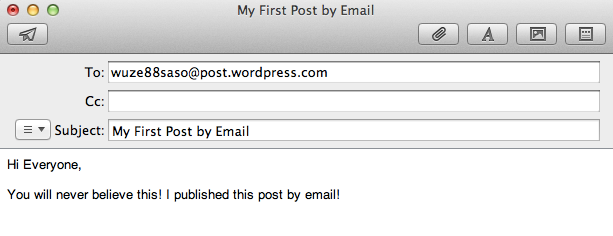
Once you have your Post by Email address, sending an email is simple:

The email subject is used as your post’s title. The body is the post’s contents.

Note: Please remember to send the email to your secret email address, not to the example given in the image above.

Mail Formatting

Your email can be plain text or formatted. As much formatting as possible will be retained, although the Post by Email system will strip unnecessary HTML tags so that your email is displayed correctly. Note that you will need to use an email client that supports rich text or HTML formatting in order to make use of this feature. Most website based clients (Hotmail, Gmail) do support this, as do most desktop clients (Outlook, Mail). You may need to switch your client into rich text or formatted mode.

Thank you Jetpack

more information here – http://jetpack.me/support/post-by-email/

WP Twitter Auto Publish Powered By : XYZScripts.com