open a new tab
type address
chrome://net-internals/#dns
and press the “Clear host cache” button.
Technology , Life & Beyond
open a new tab
type address
chrome://net-internals/#dns
and press the “Clear host cache” button.

If you are unable to view your website, or if your website is still resolving from an old server after changing the nameservers, flushing your DNS cache may resolved the issue.
Details on how to flush your DNS cache on a machine running the MAC operating system can be found below.
1. Open up a terminal window
2. Now type in the following command and press the Enter/Return key on your keyboard:
dscacheutil -flushcache
You should then see the following screen:
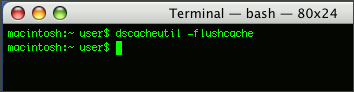
3. That’s it! You have now successfully flushed your DNS cache.

If you are unable to view your website, or if your website is still resolving from an old server after changing the nameservers, flushing your DNS cache may resolved the issue.
Details on how to flush your DNS cache on a Windows machine can be found below.
1. Click on Start > All Programs > Accessories > Command Prompt
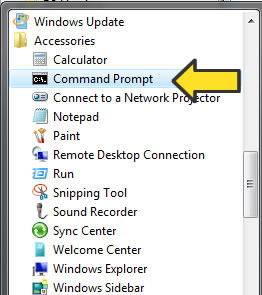
*If you are running Vista or Windows 7, you’ll need to right click on “Command Prompt” and select “Run As Administrator”
2. Now type in the following command and press the Enter/Return key on your keyboard:
ipconfig /flushdns
You should then see the following screen:
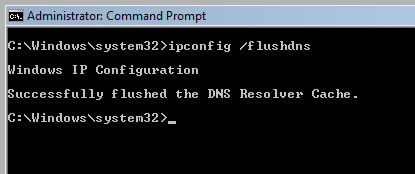
3. That’s it! You have now successfully flushed your DNS cache.
If you are unable to view your website, or if your website is still resolving from an old server after changing the nameservers, flushing your DNS cache may resolved the issue.
Details on how to flush your DNS cache on a machine running the MAC operating system can be found below.
1. Open up a terminal window
2. Now type in the following command and press the Enter/Return key on your keyboard:
lookupd -flushcache
You should then see the following screen:
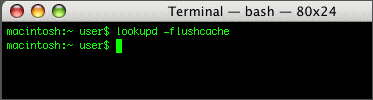
3. That’s it! You have now successfully flushed your DNS cache.
You can truncate your blog entries so that only the first part of certain posts is displayed on the home and archive pages. When you do this, a link will be placed directly after your excerpt, pointing the reader to the full post.
You can find the More Tag button in the first row of the visual editor toolbar or by pressing Alt+Shift+T:
![]()
